Friday, June 7, 2013

Puffy Paint Starfishes!

We have been working hard on our ocean animals all week. Here are just some of the ones we have made already. We used some new painting techniques on some of our animals this week too. I love how our ocean is coming out and can’t wait to show you are finished product. It’s going to look great in our playroom all summer.

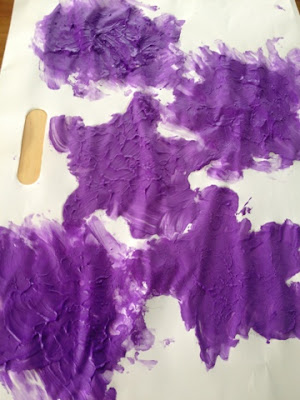
You can’t have an ocean without starfish. These were fun to make and I even got into the messy fun with Belle. I printed a cartoonish looking starfish template and traced it onto a piece of large paper. To give our starfish a fun texture we used puffy paint. I mixed shaving cream with purple paint (Belle’s choice) and we finger painted it onto our starfish. Belle started with a paintbrush but it was going on to smooth for what I wanted it to look like. I went over a couple of them to give the smoother ones a more textured look. When they were dry I cut them out and we added eyes to some of them and left the other’s just as they were. I love how these came out.

Our starfish still wet.


Next up was some jellyfish. I wanted to make jellyfish that we could hang up in our ocean. Most art activities for jellyfish that I was finding would be impossible to hang up in our ocean. So I decided to do the water coffee filters again. Belle loves it so it was a good choice. Belle spent forever coloring her jellyfish. Once done we took them outside and spayed them with water. Belle sprayed them a lot and it was evening so not much sun left in our driveway. They took a while to dry. We had to bring them inside. Once dry I cut them in half with a scalloped edge. Then we taped on some crepe paper for their tentacles.


You also can’t forget about a 150 year old sea turtle in your ocean. I drew a sea turtle out onto white construction paper. Drawing the body and shell separately. I also cut them apart for painting as well. Belle then painted the turtle’s body green and the shell brown. When dry I cut the pieces out and we glued on some torn green construction paper to the shell to give it that spotty look. We then glued the shell onto the body and added an eye and a mouth. He’s a great addition the sandy bottom of our ocean.
 
 
Finally we had to make at least one fish to go in the ocean (don’t worry we have more coming up too). I drew a fish shape onto white construction paper. To paint it we used a new technique I have been wanting to do for a while but didn’t have any bubble wrap. I took a toilet paper tube and taped on a small piece of bubble wrap to one end. We then used green, blue, and purple paint for our fish. Belle dipped the bubble wrap into the paint and used it as a stamper on her fish. It left a pretty cool scaly effect on our fish. Once dry I cut it out and Belle added an eye and mouth to her fish.


Our ocean is coming together. We still have a couple more animal friends to finish up and add to our ocean. Good thing this was out last week of a themed week until July. For the next couple weeks we just have some easy fun activities planned to keep us busy while waiting for baby sister to make her appearance. So we have plenty of time next week to finish up our ocean friends. And to finish our ocean!

Thursday, June 6, 2013

Belle's Aquarium

One of the ocean crafts I had picked put for us to do was to make our own aquarium. This was pretty easy to make and I learned some things that I should not have done but you live and learn.
 
 
To start take two paper plates. Cut the middle circle out of only one of the plates. Then cut a circle from blue construction paper for your water. I also cut out some sand from brown construction paper and seaweed from green construction paper.
 
Belle glued the blue circle onto the middle of the non-cut plate. We also glued on the sand. We then used foam ocean stickers to decorate the water part of our ocean. Our ocean stickers included seashells, starfish, dolphins, and seahorses. Once Belle was happy with her stickers we glued on a couple of the seaweed I had previously cut out.
Now this is where I made my mistake. Next you staple the other paper plate that you had cut the center out of to the other plate, back facing out. I thought it looked really plain so I had Belle paint it. She chose to paint it pink. The plate kind of flattened out from the wet paint and ended up not laying right when I stapled the plates together. I would not paint it. When stapling the two plates together don’t forget to staple a bent pipe cleaner to the top so you can hand up your new aquarium.

Wednesday, June 5, 2013

Under the Sea!

Last week we started our ocean unit. This is always a fun unit as there is so much to learn about under the sea. I decided our big art work for the summer would be an ocean scene on our art wall. I was going to just paint sand and water on easel paper but when the easel paper gets wet from paint it crinkles and isn’t easy to hang up or stay up on our wall. So I used construction paper. I cut sand waves from brown construction paper and water waves from blue construction paper. I did 2 rows of sand and 3 rows of water. I had planned on putting the darker blue on the bottom row but realized after it was all up what I did and wasn’t moving anything around again. Yes again, I had to move everything down to fit the top row in.
 
Our first ocean animal we made was our glittery crab. I precut the shapes we needed from red construction paper. We needed a large red circle for our crab’s body, 6 legs (I just cut strips), 2 claws, and 2 smaller strips for our crab’s eyes. For the eyes I cut 2 white circles and 2 smaller black circles.
To start Belle glued on all 6 legs to our crab’s body, three on each side. Then we added our small strips for his eyes to the top of our circle. We glued on the black circles to the white circles and then glued one on to each strip. Belle added a mouth with black marker when we were finished. After we were done our crab looked like it needed something. So we decided to add some silver glitter onto his body. When he was all dry we hung him up in our ocean.


I really wanted to make a whale this year. This one turned out really cute and was super easy to make. I cut out 2 circles one from black construction paper and one from white construction paper. I took the black circle and cut a scallop type shape from the bottom. I then took the scrap of black and cut it in half to use as the side fins. I cut the top fin from black construction paper with some extra paper at the bottom for the glue.
 
Belle glued the black circle on top of the white circle. We then added each of our fins and some googly eyes. For our whales mouth I cut some red yarn and we used white glue to trace the bottom of the black circle and laid the red yarn on the glue. When everything was dry we hung our killer whale in our ocean.

 
Belle loves seahorses so I knew we had to make a seahorse. It took a while for me to decide on what to do. Seahorses are supposed to be pretty and colorful (or at least that is what we always imagine them to look like). I finally decided that we would water color a couple of seahorses. I printed out a seahorse pattern and traced it on to white construction paper. I let Belle go to town on painting them. When they were dry we gave each an eye and I cut them out. We stuck them up in the ocean.
 
After I figured out all our ocean animals we were going to make I decided we needed a shark. But nothing that was going to take a while or be too time consuming. So I drew up a shark onto blue construction paper and then cut each out. I did two since they were pretty small. I cut out a top fin and a bottom fin that we glued onto the sharks. I drew on some smiles with black marker in advance and cut out tiny white triangles from white paper. We glued the triangles onto our sharks smile as their teeth. We added an eye to each and added them to our ocean.  
I can’t wait to see our ocean when all of our ocean animals are done and added! 

Tuesday, June 4, 2013

Our Finished Garden!


We finished up our garden a couple weeks ago but we were so busy with Belle’s recital week that I wasn’t able to get a post up about our last activities. We finished our Garden week by making some more fruits and veggies and a giant sunflower. We “planted” our garden on the door to the playroom.
 
First we made a kiwi. This wasn’t the easiest. We started with painting the rim of a paper plate brown. This was tough for Belle as she wanted to just paint the whole plate brown. Once the brown paint was dry we finished painting the rest of the paint green, again tough trying not to get the green paint on the brown paint. When the green paint was dry we glued on a white circle to the middle of the plate. Then Belle drew seeds on around the circle with a black marker. It’s not my favorite but was something different for our garden.
 
 
I had a couple different ideas to make grapes with Belle. We ended up making a bunch of grapes by gluing purple circles to white construction paper. I had precut a ton of purple circles in different sizes. I helped Belle start it off and she quickly got the idea. She placed the grapes where she wanted them. When we were done we added a couple of green leaves to the top of our bunch.
 
Next up we made an ear of corn. This was a fun one. We took a toilet paper tube, cut it in half and rounded the top. Belle then painted the tube yellow. When it was dry we glued on some green construction paper husks. For the corn I took white beans and painted them yellow. We glued the beans onto the tube for our corn.
 
To finish off our garden I wanted to make some type of flower. I decided on a sunflower since we did not make a sunflower during our spring weeks. I precut yellow petals from construction paper and a yellow center. I probably should have cut a brown circle. We were originally going to glue some oats to the middle but we never ended up doing it. I wanted it large so the petals are pretty big. I also precut a stem and leaves from green construction paper. Belle glued the petals around the center circle. Then we glued on our stem and our leaves.

All of our art but our grapes are on the door as a make shift garden. Our beans in the plastic bag are doing really well. They grow more each day. And our tomato plant that we bought has 3 tomatoes on it now. Can’t wait to have some homegrown tomatoes this year! 
Last week we started our ocean unit. Wait to you see all the ocean friends we have been busy making!

Monday, June 3, 2013

Belle's First Dance Recital!

Belle’s very first dance recital was this past Saturday. Can I just say that I am the proudest mom out there. She did amazing. The Hubs and I were really worried that she would be completely distracted on stage and not actually do the dance. But she proved us wrong and did the entire dance!

We had rehearsal on Wednesday. It didn’t go great sadly. Just as her class was to go on and practice their dance twice she had to do potty. We made it back half way through the first time and she got right on stage and finished up the dance. The second and last time through her shoe came untied about half way through and she was distracted for the rest of the dance doing a move here and there. Photography and videotaping isn’t allowed at the actual recital but allowed during rehearsal. I was only able to video tape the second time through and got no photos. And since I was trying to record and watch at the same time the video is pretty much crap. Shaky and cuts her off at some point cause I was too busy watching her.
Dress Rehearsal on Wednesday.

I really wish I could have recorded Saturday’s performance because she really did amazing. I am so so proud of her. And then she sat so nicely and watched the big girls dance. At intermission we thought she would make it through the whole show. She was loving watching all of the dances. But about 5 dances into the second half she started to get restless and saying she wanted to go home. So The Hubs took her home and my mom and I stayed to watch the rest.
Hoping her hair curls and holds for the show.
 
Belle dances at the studio I danced at until I was 19. This year was the studio’s 50th anniversary so they invited the alumni to come back and perform a dance during the recital. I had planned on doing it but being 36 weeks pregnant there was no way I could get up there and dance. I am so sad that I couldn’t dance with the rest of the alumni but so glad I could see them perform.

Belle at her first recital! Penguin Cha Cha!
 
Sitting in the audience and watching my old studio dance for the first time in 9 years made me miss it. I am so glad that my little girl loves and enjoyed being on stage. She couldn’t wait to get up there and perform and had a blast on stage. She was in awe of all the dances. Just like mommy! I think we have a little star on our hands.
 

Here are some pictures from rehearsal that the studio had taken. Too cute!

Friday, May 31, 2013

Moms Love Mombo - Mombo Nursing Pillow

This is a Sponsored post written by me on behalf of Comfort and Harmony for SocialSpark. All opinions are 100% mine.

With a new little one due in just 3 weeks I have been thinking and going through all the baby items we have from Belle. What worked, what didn’t work, and what can be replaced or even if we should try out a new product. One baby item that we loved and will use again is the nursing pillow. I love nursing pillows even though I didn’t breastfeed Belle. They still work great for bottle feeding, tummy time and when baby is lounging next to you.

Comfort and Harmony has the perfect nursing pillow, the Mombo. It has its own unique shape that is perfect for baby and baby’s comfort, plus mommy’s comfort as well. The Mombo has a 2 sided design called Firm 2 Soft™. The firm side is perfect for nursing. It has the much needed support for mommy, and for baby. The soft side is nice and cozy for baby, perfect for tummy time.

Mombo is the only nursing pillow to offer a vibration feature for baby’s comfort. Belle loved anything that vibrated. This would have been a great feature to have for when she was a baby. There are three different styles of the nursing pillow, the standard style, deluxe style, and the nude style. There are tons of different slipcovers to style your Mombo. You can match the nursery or pick fun different patterns. You should always have multiple slipcovers for spit ups and what not. The slipcovers are easy to remove and are machine washable. There are a ton of cute slipcovers including a Minnie Mouse and Mickey Mouse which you all know how much we love Disney in this house. They even have a taggie slipcover.

Nursing pillows are a must have item for baby and mombo nursing pillow are the best option. You can’t beat the soothing vibrations and the Firm 2 Soft™ option.

Mombo nursing pillows and products can be purchased at both Babies R Us and Toys R Us. You can also check them out at Comfort & Harmony on Facebook or follow them at Comfort & Harmony on Twitter.

Visit Sponsor's Site

Tuesday, May 21, 2013

Making our Garden

We have been having some garden fun the last week and are continuing our great gardens into this week. Last week we had a couple crafts but also planted a tomato plant and did a small science experiment.
 
The first craft we worked on was a carrot. I cut out a carrot shape from white construction paper and a leafy top from green construction paper. We painted the carrot orange by using a straw. Belle really liked painting with something other than a paintbrush. She experimented with different ways she could paint with the straw. She dragged it along the paper making streaks. She dabbed it onto the paper making circles. And of course she smeared it on. When it was dry we glued on our leafy top and hung it up on our door.


The second art we did was a tomato. We painted a paper plate red. When it was dry Belle glued on strips of green paper for the top of our tomato. We added some eyes and Belle drew on a face. I love the faces she is now drawing on our art, eyebrows, nose, mouth and cheeks. Too cute!


For our easy science experiment we took some beans and put them in a plastic bag with wet paper towels. We hung it up in a window to make sure they get plenty of sunlight. I wanted to use lima beans but the store I picked the beans up from didn’t have any. I wasn’t sure if it was going to work but when I checked on them yesterday a couple of them are starting to sprout. We’ll keep an eye on them and see how they do over the next few weeks. 


We have some more garden fun coming up throughout this week and then we move onto one of the last themes I have planned for a little while. I didn’t want to plan to much for June with the baby coming so we have some random fun activities that we will do while waiting for baby sister.

Monday, May 20, 2013

Touching Trucks and Having Fun

We had a very busy weekend, but the good kind of busy. On Saturday we had a first birthday party for a friend of ours son. Belle had fun playing and checking out the geese and baby geese that were near the park shelter the party was at. We ended our Saturday with a nice long walk around our neighborhood and the neighborhood across from us.
 
On Sunday we took Belle to the Touch a Truck event the local children’s museum was having. It was hot and crowded. I am glad we went when it opened as it just got hotter and more crowded as the day went on. We were able to do pretty much everything, some of the trucks we ended up skipping as the lines were long and in the sun. Belle got to climb into a school bus, ambulance, limo, trolley, snow plow, fire truck, excavator and so much more.


At the library truck they were giving away free books, stuffed animals, and t shirts. At a local preschool’s tent Belle got a tattoo and a sticker, and we talked with the Tae Kwon Do school that works with her school where she did Tae Kwon Do this year. Inside Belle got to play on the imagination playground which is basically large foam blocks and tubes that kids can build their own tunnels and playgrounds with. Belle found a couple pieces that were grooved that she used as a track for some balls that they had.  

 
Back outside they had a derby car track where the kids could build and decorate their own derby cars and then race them. Belle and daddy hammered the wheels on her car and I helped her decorate her car with markers and then we went over and raced her car. It had a really good start and was the first one down the hill but sadly did not win. 

Later in the afternoon we were invited over to Belle’s bestie’s house for a play date and dinner. The girls had so much fun playing on the bikes and in the water table. The girls are too cute together and have so much fun together. I am thankful that they live 5 minutes from us and will go to the same elementary school together. We already have plans for the summer to go to the zoo and have her friend come over to play. We have a nice playground and a splash pad in our neighborhood which is great to have in the summer. Her little kiddie pool is great but being able to run around at the splash pad is nice too. 


I am ready for the summer to get here. For school to be out, and well this baby to be here too. Before we know it, it will be the end of the school year and we will be busy outdoors and figuring out our new lives with the new baby. This weekend coming up is already Memorial weekend, and the following weekend is Belle’s first dance recital. The following weekend we have a party and by then I will be 38 weeks and just waiting for this baby to make her appearance.
The busy season is upon us!

Thursday, May 9, 2013

Doodle Dancing!

Preschool is starting to wrap up for the end of the school year. Belle’s last day is late June but their extracurricular activities are finishing up right now. Tuesday night was Belle’s Doodle Dance performance. So cute!


While it was hard to get some good video’s because I was sitting super close to Belle and The Hubs got stuck behind the teacher it was adorable. I was so proud that she did all three dances minus getting distracted here and there, and a few of the kids were rough housing instead of doing the dances.  

 
I can’t wait for her actual dance recital at the end of this month. It is going to be adorable and next week is Belle’s Tae Kwon Do performance at school.