Showing posts with label crafts. Show all posts

Friday, June 7, 2013

Puffy Paint Starfishes!

We have been working hard on our ocean animals all week. Here are just some of the ones we have made already. We used some new painting techniques on some of our animals this week too. I love how our ocean is coming out and can’t wait to show you are finished product. It’s going to look great in our playroom all summer.

You can’t have an ocean without starfish. These were fun to make and I even got into the messy fun with Belle. I printed a cartoonish looking starfish template and traced it onto a piece of large paper. To give our starfish a fun texture we used puffy paint. I mixed shaving cream with purple paint (Belle’s choice) and we finger painted it onto our starfish. Belle started with a paintbrush but it was going on to smooth for what I wanted it to look like. I went over a couple of them to give the smoother ones a more textured look. When they were dry I cut them out and we added eyes to some of them and left the other’s just as they were. I love how these came out.

Our starfish still wet.


Next up was some jellyfish. I wanted to make jellyfish that we could hang up in our ocean. Most art activities for jellyfish that I was finding would be impossible to hang up in our ocean. So I decided to do the water coffee filters again. Belle loves it so it was a good choice. Belle spent forever coloring her jellyfish. Once done we took them outside and spayed them with water. Belle sprayed them a lot and it was evening so not much sun left in our driveway. They took a while to dry. We had to bring them inside. Once dry I cut them in half with a scalloped edge. Then we taped on some crepe paper for their tentacles.


You also can’t forget about a 150 year old sea turtle in your ocean. I drew a sea turtle out onto white construction paper. Drawing the body and shell separately. I also cut them apart for painting as well. Belle then painted the turtle’s body green and the shell brown. When dry I cut the pieces out and we glued on some torn green construction paper to the shell to give it that spotty look. We then glued the shell onto the body and added an eye and a mouth. He’s a great addition the sandy bottom of our ocean.
 
 
Finally we had to make at least one fish to go in the ocean (don’t worry we have more coming up too). I drew a fish shape onto white construction paper. To paint it we used a new technique I have been wanting to do for a while but didn’t have any bubble wrap. I took a toilet paper tube and taped on a small piece of bubble wrap to one end. We then used green, blue, and purple paint for our fish. Belle dipped the bubble wrap into the paint and used it as a stamper on her fish. It left a pretty cool scaly effect on our fish. Once dry I cut it out and Belle added an eye and mouth to her fish.


Our ocean is coming together. We still have a couple more animal friends to finish up and add to our ocean. Good thing this was out last week of a themed week until July. For the next couple weeks we just have some easy fun activities planned to keep us busy while waiting for baby sister to make her appearance. So we have plenty of time next week to finish up our ocean friends. And to finish our ocean!

Thursday, June 6, 2013

Belle's Aquarium

One of the ocean crafts I had picked put for us to do was to make our own aquarium. This was pretty easy to make and I learned some things that I should not have done but you live and learn.
 
 
To start take two paper plates. Cut the middle circle out of only one of the plates. Then cut a circle from blue construction paper for your water. I also cut out some sand from brown construction paper and seaweed from green construction paper.
 
Belle glued the blue circle onto the middle of the non-cut plate. We also glued on the sand. We then used foam ocean stickers to decorate the water part of our ocean. Our ocean stickers included seashells, starfish, dolphins, and seahorses. Once Belle was happy with her stickers we glued on a couple of the seaweed I had previously cut out.
Now this is where I made my mistake. Next you staple the other paper plate that you had cut the center out of to the other plate, back facing out. I thought it looked really plain so I had Belle paint it. She chose to paint it pink. The plate kind of flattened out from the wet paint and ended up not laying right when I stapled the plates together. I would not paint it. When stapling the two plates together don’t forget to staple a bent pipe cleaner to the top so you can hand up your new aquarium.

Wednesday, June 5, 2013

Under the Sea!

Last week we started our ocean unit. This is always a fun unit as there is so much to learn about under the sea. I decided our big art work for the summer would be an ocean scene on our art wall. I was going to just paint sand and water on easel paper but when the easel paper gets wet from paint it crinkles and isn’t easy to hang up or stay up on our wall. So I used construction paper. I cut sand waves from brown construction paper and water waves from blue construction paper. I did 2 rows of sand and 3 rows of water. I had planned on putting the darker blue on the bottom row but realized after it was all up what I did and wasn’t moving anything around again. Yes again, I had to move everything down to fit the top row in.
 
Our first ocean animal we made was our glittery crab. I precut the shapes we needed from red construction paper. We needed a large red circle for our crab’s body, 6 legs (I just cut strips), 2 claws, and 2 smaller strips for our crab’s eyes. For the eyes I cut 2 white circles and 2 smaller black circles.
To start Belle glued on all 6 legs to our crab’s body, three on each side. Then we added our small strips for his eyes to the top of our circle. We glued on the black circles to the white circles and then glued one on to each strip. Belle added a mouth with black marker when we were finished. After we were done our crab looked like it needed something. So we decided to add some silver glitter onto his body. When he was all dry we hung him up in our ocean.


I really wanted to make a whale this year. This one turned out really cute and was super easy to make. I cut out 2 circles one from black construction paper and one from white construction paper. I took the black circle and cut a scallop type shape from the bottom. I then took the scrap of black and cut it in half to use as the side fins. I cut the top fin from black construction paper with some extra paper at the bottom for the glue.
 
Belle glued the black circle on top of the white circle. We then added each of our fins and some googly eyes. For our whales mouth I cut some red yarn and we used white glue to trace the bottom of the black circle and laid the red yarn on the glue. When everything was dry we hung our killer whale in our ocean.

 
Belle loves seahorses so I knew we had to make a seahorse. It took a while for me to decide on what to do. Seahorses are supposed to be pretty and colorful (or at least that is what we always imagine them to look like). I finally decided that we would water color a couple of seahorses. I printed out a seahorse pattern and traced it on to white construction paper. I let Belle go to town on painting them. When they were dry we gave each an eye and I cut them out. We stuck them up in the ocean.
 
After I figured out all our ocean animals we were going to make I decided we needed a shark. But nothing that was going to take a while or be too time consuming. So I drew up a shark onto blue construction paper and then cut each out. I did two since they were pretty small. I cut out a top fin and a bottom fin that we glued onto the sharks. I drew on some smiles with black marker in advance and cut out tiny white triangles from white paper. We glued the triangles onto our sharks smile as their teeth. We added an eye to each and added them to our ocean.  
I can’t wait to see our ocean when all of our ocean animals are done and added! 

Tuesday, June 4, 2013

Our Finished Garden!


We finished up our garden a couple weeks ago but we were so busy with Belle’s recital week that I wasn’t able to get a post up about our last activities. We finished our Garden week by making some more fruits and veggies and a giant sunflower. We “planted” our garden on the door to the playroom.
 
First we made a kiwi. This wasn’t the easiest. We started with painting the rim of a paper plate brown. This was tough for Belle as she wanted to just paint the whole plate brown. Once the brown paint was dry we finished painting the rest of the paint green, again tough trying not to get the green paint on the brown paint. When the green paint was dry we glued on a white circle to the middle of the plate. Then Belle drew seeds on around the circle with a black marker. It’s not my favorite but was something different for our garden.
 
 
I had a couple different ideas to make grapes with Belle. We ended up making a bunch of grapes by gluing purple circles to white construction paper. I had precut a ton of purple circles in different sizes. I helped Belle start it off and she quickly got the idea. She placed the grapes where she wanted them. When we were done we added a couple of green leaves to the top of our bunch.
 
Next up we made an ear of corn. This was a fun one. We took a toilet paper tube, cut it in half and rounded the top. Belle then painted the tube yellow. When it was dry we glued on some green construction paper husks. For the corn I took white beans and painted them yellow. We glued the beans onto the tube for our corn.
 
To finish off our garden I wanted to make some type of flower. I decided on a sunflower since we did not make a sunflower during our spring weeks. I precut yellow petals from construction paper and a yellow center. I probably should have cut a brown circle. We were originally going to glue some oats to the middle but we never ended up doing it. I wanted it large so the petals are pretty big. I also precut a stem and leaves from green construction paper. Belle glued the petals around the center circle. Then we glued on our stem and our leaves.

All of our art but our grapes are on the door as a make shift garden. Our beans in the plastic bag are doing really well. They grow more each day. And our tomato plant that we bought has 3 tomatoes on it now. Can’t wait to have some homegrown tomatoes this year! 
Last week we started our ocean unit. Wait to you see all the ocean friends we have been busy making!

Tuesday, May 21, 2013

Making our Garden

We have been having some garden fun the last week and are continuing our great gardens into this week. Last week we had a couple crafts but also planted a tomato plant and did a small science experiment.
 
The first craft we worked on was a carrot. I cut out a carrot shape from white construction paper and a leafy top from green construction paper. We painted the carrot orange by using a straw. Belle really liked painting with something other than a paintbrush. She experimented with different ways she could paint with the straw. She dragged it along the paper making streaks. She dabbed it onto the paper making circles. And of course she smeared it on. When it was dry we glued on our leafy top and hung it up on our door.


The second art we did was a tomato. We painted a paper plate red. When it was dry Belle glued on strips of green paper for the top of our tomato. We added some eyes and Belle drew on a face. I love the faces she is now drawing on our art, eyebrows, nose, mouth and cheeks. Too cute!


For our easy science experiment we took some beans and put them in a plastic bag with wet paper towels. We hung it up in a window to make sure they get plenty of sunlight. I wanted to use lima beans but the store I picked the beans up from didn’t have any. I wasn’t sure if it was going to work but when I checked on them yesterday a couple of them are starting to sprout. We’ll keep an eye on them and see how they do over the next few weeks. 


We have some more garden fun coming up throughout this week and then we move onto one of the last themes I have planned for a little while. I didn’t want to plan to much for June with the baby coming so we have some random fun activities that we will do while waiting for baby sister.

Thursday, May 9, 2013

Painting the Driveway

We finally have beautiful weather here. We have been spending as much time outside as we can. Last week we went down to the waterfront and walked around looking at the ships at the Naval Museum. On Friday after preschool we took a ride to Niagara Falls and walked around there taking in the beautiful weather and sites. We spent the weekend at home enjoying the weather.
 
On Sunday I made Belle some sidewalk paint. I made some last year and Belle loved it. She loves painting and when it’s nice out we take our crafts outside as much as we can. But this time I decided to paint the driveway.


Sidewalk paint is super easy to make. All you need is cornstarch, food coloring, and water. I use a muffin tin to put our paints in and we use big brushes to paint on the driveway. I mix up the cornstarch and food coloring in the house and add the water once outside. I used neon, pastel, and regular food coloring this time so we had a variety of colors. They came out so vibrant against our blacktop driveway.  


Our driveway is full of bright colors and will wash away when the rain comes that they are calling for. We only managed to do this once last year but I am hoping and planning on doing this more this summer. And I have already added this to the plans for Belle’s friend birthday party we are having at the end of August.

Wednesday, May 8, 2013

Cupcake Flowers

To finish up our spring time fun we made some flowers out of cupcake liners. We made these outside and it was a little bit windy so I don’t have any pictures of us making them. I had to help hold things down and make sure extra pieces didn’t blow away. These came out really cute and Belle really likes these flowers out of all the ones we made.
 
We used a sheet of white construction paper to glue our flowers onto. We started by decorating the insides of our cupcake liners. I had colored liners but if they were white we would have painted them with water colors first. To decorate the inside of our flowers we used some leftover pieces of plastic we had from a stepping stone craft we made a few years ago, foam flower stickers, and red gems.
 
When Belle was done with the flower tops we glued them onto our white paper. We probably should have glued them to the paper first and then decorated the centers. Then we added stems and leaves from green construction paper.
 
This didn’t take us long and came out really cute.


Friday, April 26, 2013

Flower Prints

After we worked on our flower mural over the weekend I realized I didn’t have many spring crafts for us to work on. Especially since I had originally scheduled our mural to be worked on Tuesday. I am glad we started it over the weekend because it took some time with the paint drying and gluing on all the stems and leaves. But I had nothing for us to do on Tuesday when Belle would be home with me. And to top it off she was home 3 days in a row this week because of dance pictures on Wednesday. Easier to keep her home (and clean) and get her ready and to the studio on time then taking her to school and rushing around all afternoon.


Anyways, so I quickly came up with this art work. I took some toilet paper tubes I had put aside and cut different patterns into the top of them. Umm, not so easy to cut scallops into a toilet paper tube just so you know.  


I had Belle pick what colors she wanted to use, pink, blue, and yellow were her choices. I also let her decide which patterned tube went into which color paint. We then made prints onto some finger paint paper. Belle liked this one. It was easy and she could do whatever she wanted. It came out cute and is replacing our zoo sponge painting picture on our wall. 

Thursday, April 25, 2013

Flower Garden

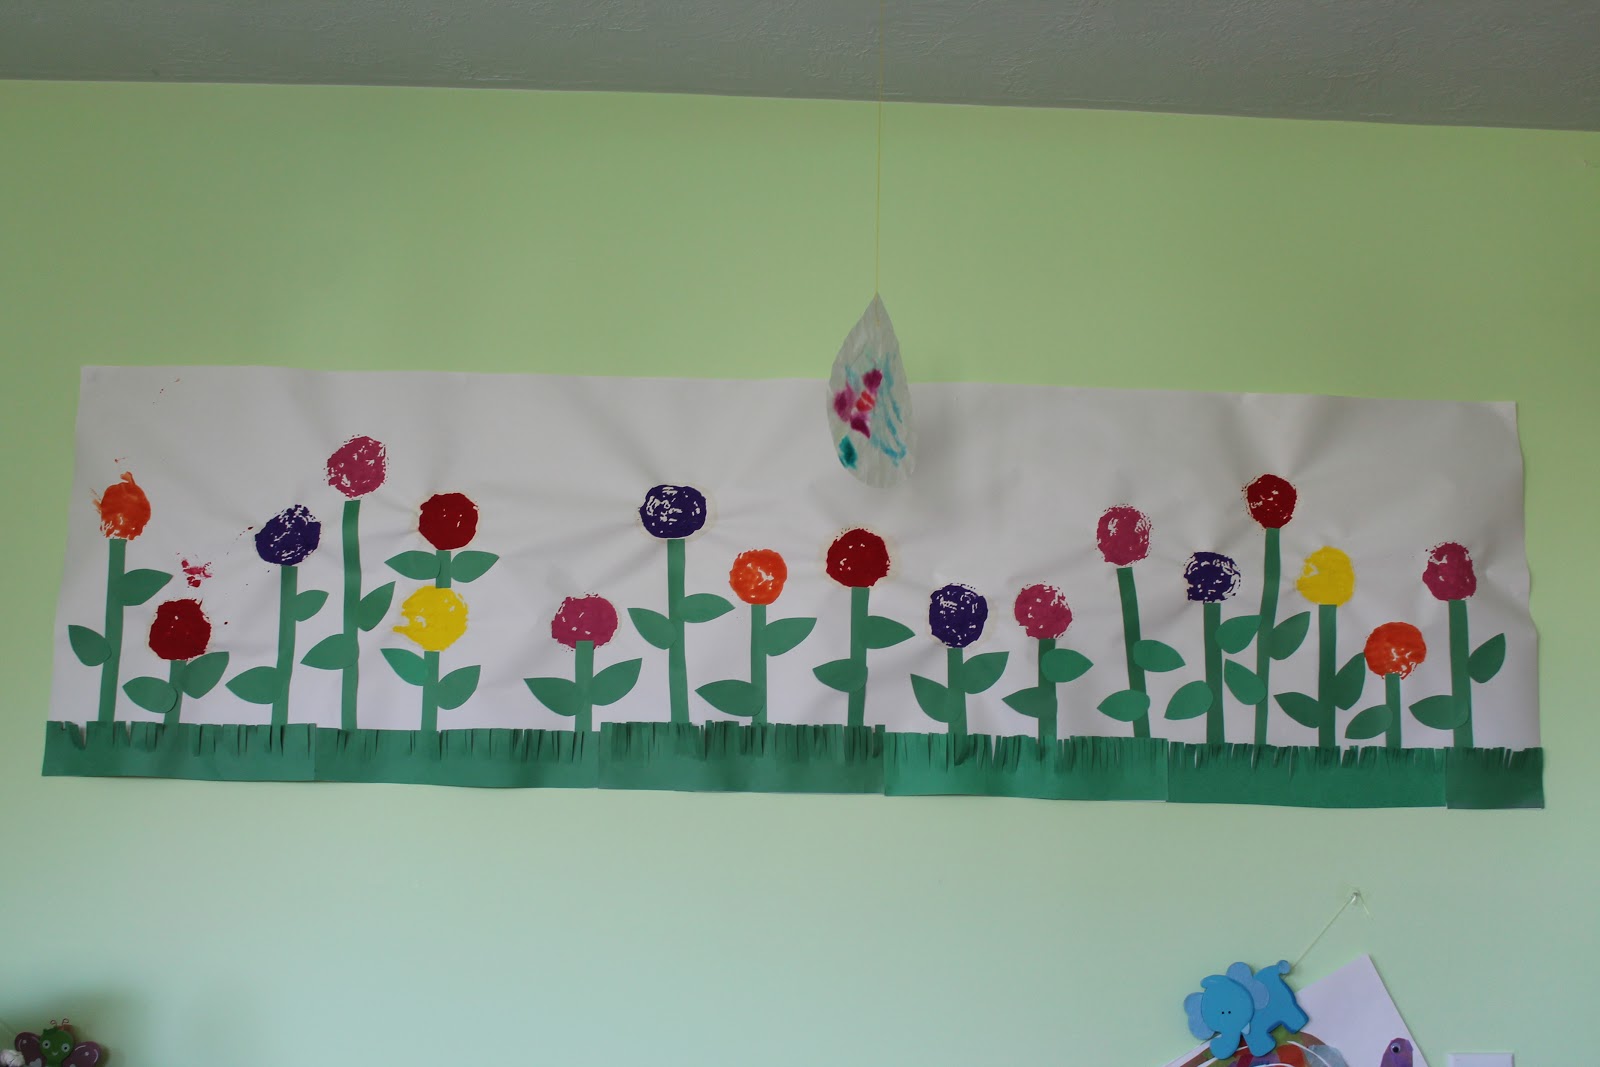
I have said multiple times we are trying to bring spring into the playroom in hopes of bringing the spring weather for good. And well who doesn’t love bright colors and spring like crafts to brighten a room up? It was time to replace our dinosaur scene we made back in February. I had an art activity I wanted to do and after thinking about it decided it would be perfect for a spring mural on our wall.
 
To start I took a large piece of easel paper and laid it out on the floor of the playroom. This is the largest scene I think we have ever made. Belle picked out 5 different colors to use as her flowers. I put some paint onto 5 different plates and gave her a dish scrubbie for each color. Belle then made prints with the dish scrubbies all the way down our easel paper.


When our prints were dry Belle and glued on stems and leaves from green construction paper to each print to make a flower. I then added some grass that I made from scraps of green construction paper.
It came out super cute but boy was it a paint to hang up. With the paint on the paper, it kind of wrinkled so it wouldn’t lay flat. It took forever to get it to hang up and look decent so you could actually see the picture. Plus it was so long I would get one side up and start working on flattening the picture and the other side would start to fall down. But it is up and looks great!


We have tons of flowers that we are making this week and next week. It’s going to look like a garden in here soon!